
— — — — —
— — — — —
— — — — —
— — — — —
— — — — —
— — — — —
— — — — —
— — — — —
The Stats Editor allows you to set up various stat-related aspects for your game. This includes character stats, experience leveling data, equipment slot configurations, skills, status effects, and currencies.
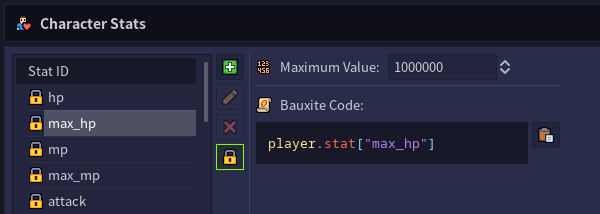
The Character Stats section allows you to modify certain aspects of the stats for your game's characters. This includes defining maximum values for the built-in stats and creating custom stats. To add a custom stat, click the green “plus” button. Clicking the red “X” button will remove the currently selected stat, while the “pencil” button can be used to rename a custom stat.
Refer to the table below for a list of built-in stats that can be retrieved or modified for a character.
| Stat Name | Description | ID |
|---|---|---|
| HP | Health/HP of the character. | “hp” |
| Max HP | Maximum health/HP of the character. | “max_hp” |
| MP | Magic/MP of the character. | “mp” |
| Max MP | Maximum magic/MP of the character. | “max_mp” |
| XP | Total experience points earned by the character. | “xp” |
| Level | Current experience level of the character. | “level” |
| Currency | Amount of currency held by the character. | “currency” |
| Attack | Attack value of the character. | “attack” |
| Defense | Defense value of the character. | “defense” |
| Movement Range | Movement range (in tiles) of the character. This stat is used in tactical turn-based combat. | “move_range” |
| Movement Speed | Movement speed (in voxels per second) of the character. | “speed” |
A character's stats can be accessed in a script using the built-in “.stat” syntax along with one of the IDs listed in the “ID” column above. The specific Bauxite code for referencing a stat can be copied to the clipboard by selecting the stat in the editor then clicking the “clipboard” icon next to the code. You can also use the Set Stat, Increase Stat, and Decrease Stat scripting functions to modify a stat.
Examples:
Restore the player's health to the maximum value (directly and via Set Stat):
player.stat["hp"] = player.stat["max_hp"];
set_stat("hp", player.stat["max_hp"], player);
Increase the player's currency by 100 (directly and via Increase Stat):
player.stat["currency"] += 100;
increase_stat("currency", 100, player);
The Leveling section allows you to set up leveling information for your characters. This includes a table of levels and the experience points required for each level. You can configure specific stat increases for each level, including any custom stats you've defined in the Character Stats section. When a character reaches a particular level, those stat increases will be automatically applied.
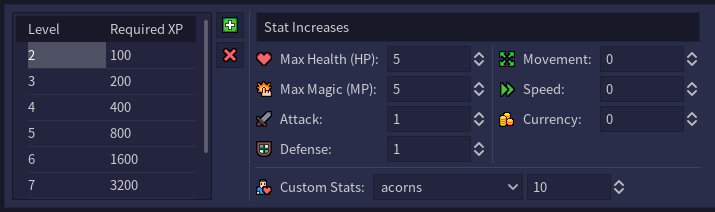
To add a new level to the table, click the green “plus” button. Clicking on a value in the “Required XP” column will allow you to edit the amount required for that level. To adjust the stat increases for a particular level, click on the level number in the “Level” column. To remove a level, click the red “X” button.
Note that each level can have more than one custom stat increase. To set the increase for each stat, select it from the “Custom Stats” dropdown and set the desired value. The amount for each stat will be stored, allowing multiple custom stats to be increased when a character levels up!
The Equipment section allows you to view and edit equipment slot configurations for the characters in your game. The default built-in slot configuration can be viewed but not edited. To add a new slot configuration, click the green “plus” button. To set a custom slot configuration as the default one for your game, click the “star” button. A slot configuration can be removed by clicking the red “X” button.
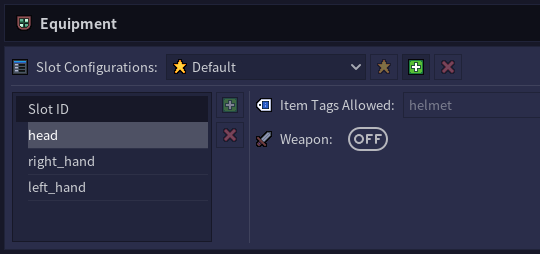
When a custom configuration is selected in the “Slot Configurations” dropdown, you can edit the equipment slots for that configuration. To add a slot, click the green “plus” button. A slot can be removed by clicking the red “X” button. Clicking on a slot ID allows you to edit that slot. See below for a description of each setting.
| Setting | Description |
|---|---|
| Item Tags Allowed | Determines which item tags are allowed for this slot. In order for an item to be equipped into this slot, it must have at least one of these tags defined for it in the Item Editor. Multiple tags can be specified by separating them with commas. |
| Weapon | Determines if this slot is for weapons (for future functionality). |
You can override the default equipment slot configuration for a specific character via the “Equipment Slot Config” setting on the Model Properties tab in the Voxel Editor. This can be useful if you want certain characters to use equipment other than the default configuration.
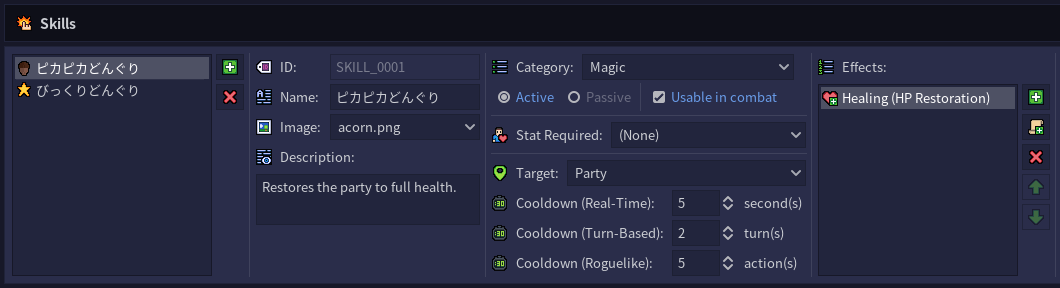
The Skills section allows you to create special abilities for the player characters in your game to use, e.g. spells or other capabilities that let them interact with other characters, themselves, or even their environment in various ways. To add a skill, click the green “plus” button. A skill can be removed by clicking the red “X” button.
See below for a description of each skill setting.
| Setting | Description |
|---|---|
| ID | Unique ID for the skill. This ID is used with the Give Skill, Remove Skill, and Use Skill scripting functions. |
| Name | Name of the skill. The name is displayed on the skill's tooltip (shown in-game when hovering over a skill slot with that skill assigned). |
| Image | Image for the skill. The image is displayed in skill slots with that skill assigned. |
| Description | Description of the skill. The description is displayed on the skill's tooltip (shown in-game when hovering over a skill slot with that skill assigned). |
| Category | Category of the skill (for future functionality). |
| Active/Passive | Determines whether the skill must be activated/triggered (e.g. a healing spell that the player uses) or if it's an ongoing effect (e.g. a passive defense boost given to the character by just possessing the skill). At this time only active skills are supported. |
| Usable in Combat | Determines whether or not the skill can be used during turn-based battles. |
| Stat Required | Determines which stat must be consumed in order to use the skill (defaults to none). |
| Target | Currently supported targets: Self, Party, Party Member, Enemy, and All Enemies. |
| Cooldown (Real-Time) | Determines the cooldown for the skill when used in real-time mode. For real-time mode, the cooldown is measured in seconds. |
| Cooldown (Turn-Based) | Determines the cooldown for the skill when used in turn-based battles. For turn-based battles, the cooldown is measured in turns. |
| Cooldown (Roguelike) | Determines the cooldown for the skill when used in roguelike mode. In roguelike mode, the cooldown is measured in actions. |
| Effects | List of effects that will occur (as ordered) when the skill is used. An effect can either be a built-in one (added via the green “plus” button, see table below for descriptions of each option) or a custom script added via the button with a script icon. When using a custom script, a $target variable will be available to the script which can be used to reference the chosen target. The $target variable will be an array when using the “Party” or “All Enemies” target option, otherwise an entity. |
| Effect Details | Section for any settings specific to the currently selected skill effect. |
Refer to the table below for a description of each effect that can be added to a skill.
| Skill Effect | Description |
|---|---|
| Healing (HP Restoration) | Heals the target(s) for a fixed amount or a percentage of their HP. |
| Damage (HP Loss) | Damages the target(s) for a fixed amount or a percentage of their HP. |
| Temporary Stat Buff | Increases a specific stat for the target(s) for a limited duration of time. |
| Temporary Stat Debuff | Decreases a specific stat for the target(s) for a limited duration of time. |
| Apply Status Effect | Applies a status effect to the target(s) for a limited duration of time. |
| Remove Status Effect | Removes a status effect from the target(s). |
| Clear Status Effects | Clears all status effects from the target(s). |
| Summon Character | Summons a character to join the player's team. When activated, the player will be prompted for a target tile onto which the character will be summoned. Currently only supported in real-time mode. |
| Play Sound | Plays a sound effect. |
The Status Effects section allows you to create statuses that can be applied to characters for a duration of time or permanently, e.g. healing/damage over time or stat buffs/debuffs. To add a status effect, click the green “plus” button. A status effect can be removed by clicking the red “X” button.
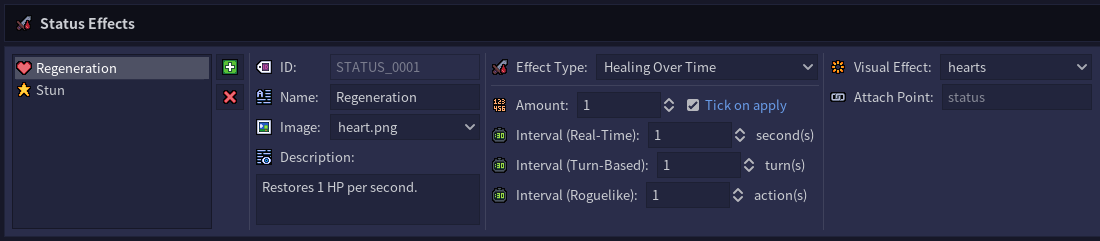
See below for a description of each status effect setting.
| Setting | Description |
|---|---|
| ID | Unique ID for the status effect. This ID is used with the Apply Status Effect, Remove Status Effect, and Clear Status Effects scripting functions. |
| Name | Name of the status effect. Currently this is only used by the editor for display purposes. |
| Image | Image for the status effect. Currently this is only used by the editor for display purposes. |
| Description | Description of the status effect. Currently this is only used by the editor for display purposes. |
| Effect Type | Determines how the status effect affects its target. Currently supported types: Stat Buff, Stat Debuff, Healing Over Time, Damage Over Time, and Stun. |
| Affected Stat | Determines which character stat is affected by the status effect. Only applicable to the Stat Buff and Stat Debuff effect types. |
| Amount | Determines the amount by which the character's stat will be affected. Only applicable to the Stat Buff, Stat Debuff, Healing Over Time, and Damage Over Time effect types. |
| Tick on Apply | Determines if the status effect immediately triggers when first applied to a character (e.g. a bleeding effect that deals damage right away) or if it waits until the first configured interval of time has passed (see interval settings below). |
| Interval (Real-Time) | Determines the frequency of the effect while in real-time mode (e.g. a Healing Over Time effect with an interval of 2 means the healing will occur every two seconds). Only applicable to the Healing Over Time and Damage Over Time effect types. |
| Interval (Turn-Based) | Determines the frequency of the effect while in a turn-based battle (e.g. a Healing Over Time effect with an interval of 2 means the healing will occur every two turns). Only applicable to the Healing Over Time and Damage Over Time effect types. |
| Interval (Roguelike) | Determines the frequency of the effect while in roguelike mode (e.g. a Healing Over Time effect with an interval of 2 means the healing will occur every two actions). Only applicable to the Healing Over Time and Damage Over Time effect types. |
| Visual Effect | Particle effect that will be attached to characters who have this status effect applied. By default, it will be attached to the attach point with an ID of “status”, however this can be changed per status effect (see setting below). |
| Attach Point | Determines which attach point to use if a visual effect is assigned to this status effect (see setting above). Defaults to “status”. |
The Currency section allows you to edit the name and image for the built-in base currency, and even create custom currencies for your game. To add a custom currency, click the green “plus” button. A custom currency can be removed by clicking the red “X” button. You can choose the name and image for a custom currency, as well as the stat to which it will be tied.

Refer to the table below for a description of each currency setting.
| Setting | Description |
|---|---|
| Currency Name | Name of the currency. Changing this for the base currency will affect what is displayed on the built-in inventory widget. |
| Associated Stat | Stat to which the currency is tied (i.e. the stat that will store how much of the currency a character has). |
| Image | Image to use for the currency. Changing this for the base currency will affect what is displayed on the built-in inventory widget. |
If you wanted your game to have a “Gems” currency, you would first create a custom stat with an ID of “gems”, then create a currency named “Gems” that's tied to the “gems” stat. The Give Currency and Remove Currency functions can be used to adjust a character's currency amount.