
— — — — —
— — — — —
— — — — —
— — — — —
— — — — —
— — — — —
— — — — —
— — — — —
This is an old revision of the document!
The Dialogue Editor is where you will create conversations for your game's characters or narration for scripted sequences and cutscenes. Dialogue can be attached to an NPC from its Entity Properties dialog in the Map Editor or triggered from a script using the Start Dialogue function.
| Function | Description |
|---|---|
| New Resource | Opens the New Resource dialog (with “Dialogue” selected for the resource type). |
| Save | Saves changes to the dialogue. |
| Save As | Saves a copy of the dialogue to a new file. |
| Add Section | Adds a new section to the dialogue. A section can be jumped to using a “Go To” node. |
| Collapse All | Collapses all dialogue nodes that have any child nodes underneath them. |
| Expand All | Expands all dialogue nodes that have any child nodes underneath them. |
| Compact All | Enables compact mode for all dialogue nodes. |
| Decompact All | Disables compact mode for all dialogue nodes. |
The Dialogue Tools panel (located below the Game Explorer) contains a list of nodes that can be added to your dialogue. A node represents a specific point in the dialogue where an event occurs, for example when a character speaks, a message is displayed, a condition is evaluated, or a script is triggered. To add a node to your dialogue, drag and drop an item from the list to the desired location within your dialogue. Selecting an item will display usage information about that node type in the description box below.

The Dialogue Tree is the visual workspace where you will build your dialogue. Nodes can be removed from the Dialogue Graph by clicking on their “X” button located in the upper right corner of the node.
There are several different types of nodes that can be added to a dialogue tree. Refer to each section below for an explanation of that node type's purpose and any options that can be set.
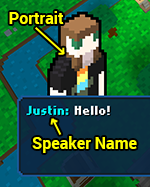
NPC nodes are for dialogue spoken by non-player characters (i.e. characters other than the player). Clicking the “Edit” button allows you to enter the text that will be displayed in the game's dialogue box when this node is reached.
The NPC's default portrait (as defined in the Voxel Editor) can be overridden for a specific node by selecting an image from the “Portrait” dropdown box. Selecting “None” will cause the portrait to be hidden.
The “Speaker” setting is used by the game to determine the name that is displayed for the speaker, along with its text color. Each setting is described in the table below.
| Speaker Setting | Description |
|---|---|
| Initiating NPC | Character from which the dialogue was started determines the speaker name and the text color. |
| Entity ID | Character having the specified entity ID determines the speaker name and the text color. |
| Custom Name | Speaker name is overridden with the specified text. |
| Custom Name/Color | Speaker name and its color are overridden with the specified name and text color. |
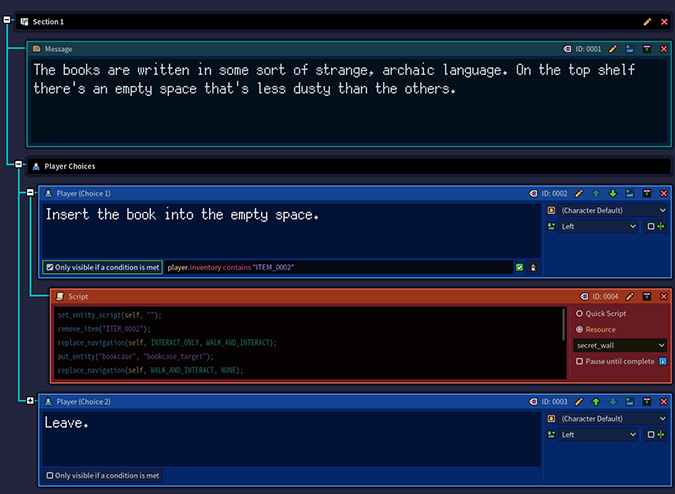
Player nodes are for dialogue spoken by the player character. Clicking the “Edit” button allows you to enter the text that will be displayed in the game's dialogue box when this node is reached.
The player's default portrait (as defined in the Voxel Editor) can be overridden for a specific node by selecting an image from the “Portrait” dropdown box. Selecting “None” will cause the portrait to be hidden.

You can connect more than one “Player” node to the output connector of another node. Doing so will provide the player with a list of responses to choose from and allow the dialogue to be branched based upon the player's response.
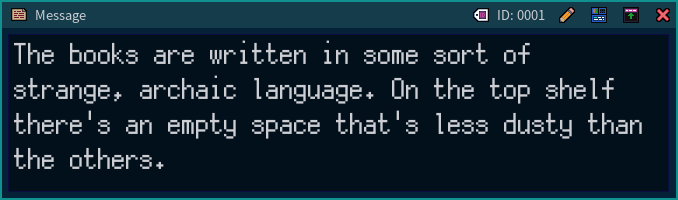
Message nodes are used to display any general text that is not spoken by a character, for example to describe an event that is occurring in the scene.
Clicking the “Edit” button allows you to enter the text that will be displayed in the game's dialogue box when this node is reached. This is similar to using the Display Message function in a script.
Condition nodes provide a way of branching the dialogue based on the results of a conditional expression being evaluated.
Clicking the “Edit” button opens the Conditional Expression Builder, allowing you to define the conditional expression that will be evaluated when this node is reached. If the condition is met (i.e. evaluates to true), then the dialogue will proceed to the node connected to the “Then” output connector. Otherwise, it will proceed to the node connected to the “Else” output connector.

Script nodes provide a way to trigger scripts during the dialogue, for example to give an item to the player or move the camera to a different viewpoint. You can choose between either a “Quick Script” or a “Resource” (i.e. an existing script file). If the “Quick Script” option is selected, clicking the “Build” button will open the Quick Script Builder.
The “Pause until complete” checkbox determines whether or not the dialogue will wait for the script to complete before proceeding. For example, if the script includes a timed camera movement and “Pause until complete” is checked, the dialogue will not proceed until the camera movement has finished.
